How To Install & Configure Percona XtraDB Cluster 5.6 on CentOS/RHEL 6x

This Cluster will be assembled of Two (2) Servers/Nodes :
Node #1
Hostname: server1.centos.com
IP: 192.168.100.140
Node #2
Hostname: server2.centos.com
IP: 192.168.100.142
Prerequisites :
==========
1. All two Nodes have a CentOS 6.6 Installation.
2. Firewall has been set up to allow Connecting to Ports 3306, 4444, 4567 and 4568
3. SELinux is Disabled
4. MySQL should be Removed.
5. Configure Password-less Authentication (RSA/DSA) (Optional).
Installation :
=========
Step: 1. Make entry to the host file of each Server :
# vi /etc/hosts
192.168.100.140 server1.centos.com server1
192.168.100.142 server2.centos.com server2
-- Save & Quit (:wq)
Step: 2. Enable EPEL Repo and Percona Repo on your Server :
# rpm -Uvh http://dl.fedoraproject.org/pub/epel/6/x86_64/epel-release-6-8.noarch.rpm
Step: 3. Install Dependency for Percona :
# yum install -y socat libaio* perl-DBD-MySQL perl-Time-HiRes rsync wget
# wget --no-cache http://www.convirture.com/repos/definitions/rhel/6.x/convirt.repo -O /etc/yum.repos.d/convirt.repo
# yum makecache
Step: 4. Download the Packages on the Server :
# yum -y install http://www.percona.com/downloads/percona-release/redhat/0.1-3/percona-release-0.1-3.noarch.rpm
# yum install -y Percona-XtraDB-Cluster-56
Step: 5. Configuring the Nodes :
On Node1 : i.e 192.168.100.140
========================
# vi /etc/my.cnf
[mysqld]
skip-host-cache
skip-name-resolve
max_connections=10000
max_connect_errors=200
datadir=/var/lib/mysql
user=mysql
# Path to Galera library
wsrep_provider=/usr/lib64/libgalera_smm.so
# Cluster connection URL contains the IPs of node#1, node#2
wsrep_cluster_address=gcomm://192.168.100.140,192.168.100.142
# In order for Galera to work correctly binlog format should be ROW
binlog_format=ROW
# MyISAM storage engine has only experimental support
default_storage_engine=InnoDB
# This is a recommended tuning variable for performance
innodb_locks_unsafe_for_binlog=1
# This changes how InnoDB autoincrement locks are managed and is a requirement for Galera
innodb_autoinc_lock_mode=2
# Node #1 Address
wsrep_node_address=192.168.100.140
# SST Method
wsrep_sst_method=xtrabackup
# Cluster Name
wsrep_cluster_name=my_centos_cluster
# Authentication for SST Method
wsrep_sst_auth="sstuser:s3cret"
wsrep_replicate_myisam=1
-- Save & Quit (:wq)
Step: 6. Start the first Node with the Following Command :
# /etc/init.d/mysql bootstrap-pxc
OR
# /etc/init.d/mysql start --wsrep-cluster-address="gcomm://"
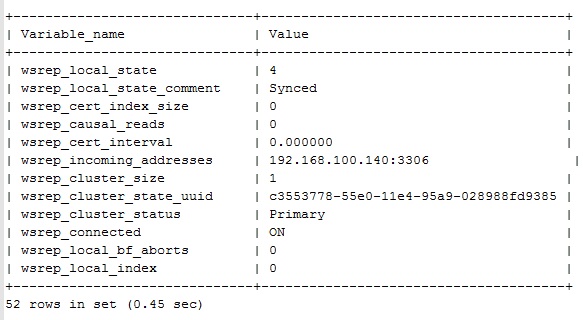
Step: 7. Now, Login to MySQL and check the Cluster Status :
# mysql -u root
mysql> show status like 'wsrep%';
Step: 8. Change the MySQL root Password :
# mysql -u root
mysql> UPDATE mysql.user SET password=PASSWORD("redhat") where user='root';
mysql> FLUSH PRIVILEGES;
Step: 9. In order to perform Successful State Snapshot Transfer using XtraBackup new user Needs to be set up with proper Privileges :
# mysql -u root -p
Enter Password:
mysql> CREATE USER 'sstuser'@'localhost' IDENTIFIED BY 's3cret';
mysql> GRANT RELOAD, LOCK TABLES, REPLICATION CLIENT ON *.* TO 'sstuser'@'localhost';
mysql> FLUSH PRIVILEGES;
Note: MySQL root account can also be used for setting up the SST with Percona XtraBackup, BUT it's recommended to use a different (non-root) user for this.
Node 2 : i.e 192.168.100.142
======================
# vi /etc/my.cnf
[mysqld]
skip-host-cache
skip-name-resolve
max_connections=10000
max_connect_errors=200
# Path to Galera library
wsrep_provider=/usr/lib64/libgalera_smm.so
# Cluster connection URL contains IPs of node#1, node#2
wsrep_cluster_address=gcomm://192.168.100.140,192.168.100.142
# In order for Galera to work correctly binlog format should be ROW
binlog_format=ROW
# MyISAM storage engine has only experimental support
default_storage_engine=InnoDB
# This is a recommended tuning variable for performance
innodb_locks_unsafe_for_binlog=1
# This changes how InnoDB autoincrement locks are managed and is a requirement for Galera
innodb_autoinc_lock_mode=2
# Node #2 address
wsrep_node_address=192.168.100.142
# Cluster name
wsrep_cluster_name=my_centos_cluster
# SST method
wsrep_sst_method=xtrabackup
# Authentication for SST method
wsrep_sst_auth="sstuser:s3cret"
wsrep_replicate_myisam=1
-- Save & Quit (:wq)
Now Start the Cluster on Node 2 :
# service mysql restart
# mysql -u root -p
Enter Password:
mysql> show status like 'wsrep%';

Testing :
======
A. Creating the new Database on the Node2 :
mysql> CREATE DATABASE test;
B. Creating the Example Table :
mysql> USE test;
mysql> CREATE TABLE example (node_id INT PRIMARY KEY, node_name VARCHAR(30));
C. Inserting Records on the Node1 :
mysql> INSERT INTO test.example VALUES (1, 'test1');
D. Retrieving all the Rows from that Table on the Node2 :
mysql> SELECT * FROM test.example;

Thanks For Visiting on My Blog, For More Tutorials Keep Visiting My Blog
I followed this, After modify 2nd node my.cnf file I tried to start mysql and got following error.
ReplyDeleteservice mysql restart
Shutting down MySQL (Percona XtraDB Cluster) ERROR! MySQL (Percona XtraDB Cluster) PID file could not be found!
ERROR! MySQL (Percona XtraDB Cluster) is not running, but lock file (/var/lock/subsys/mysql) exists
Starting MySQL (Percona XtraDB Cluster)./usr/bin/mysqld_safe: line 253: [: -ne: unary operator expected
.....State transfer in progress, setting sleep higher
. ERROR! The server quit without updating PID file (/var/lib/mysql/mysql.pid).
ERROR! MySQL (Percona XtraDB Cluster) server startup failed!
ERROR! Failed to restart server.
I followed exactly same steps and I could bootstrap the first node. But 2nd node not starting and giving above error
This comment has been removed by the author.
DeleteFollow the below steps:
DeleteStep: 1. Gracefully Shutdown the Master Database (server1.centos.com) :
# service mysql stop
Step: 2. Gracefully Shutdown the Slave Database (server2.centos.com) :
# service mysql stop
Step: 3. Starting Clod Rsync Process on Slave Database :
On Slave Database :
# cd /var/lib/
# rm -rf mysql
# rsync -avz -e ssh server2.centos.com:/var/lib/mysql /var/lib/
Step: 4. Start Master Database :
# service mysql bootstrap-pxc
Step: 5. Start Slave Database :
# service mysql restart
Step: 6. Now Again Restart the Master Database :
# service mysql restart
Step: 7. Check Database Status :
mysql> show status like '%wsrep%';
mysql> exit
Step: 8. Check Both the Cluster Sync or Not :
# /usr/bin/clustercheck root root_password
Great it worked.
ReplyDeleteOne more thing I found that ownership of /var/lib/mysql must be mysql
Thanks
Yes, mysql directory must be own by 'mysql' user.
DeleteHere I have used 'rsync' command with '-a' option that preserves the permissions, ownership, timestamp of files and folders that are to be rsynced. That's why i've skip that step.
I really appreciate information shared above. It’s of great help. If someone want to learn Online (Virtual) instructor lead live training in Couch DB, kindly contact us http://www.maxmunus.com/contact
ReplyDeleteMaxMunus Offer World Class Virtual Instructor led training on Couch DB. We have industry expert trainer. We provide Training Material and Software Support. MaxMunus has successfully conducted 100000+ trainings in India, USA, UK, Australlia, Switzerland, Qatar, Saudi Arabia, Bangladesh, Bahrain and UAE etc.
For Demo Contact us.
Nitesh Kumar
MaxMunus
E-mail: nitesh@maxmunus.com
Skype id: nitesh_maxmunus
Ph:(+91) 8553912023
http://www.maxmunus.com/