Drop Down MenusCSS Drop Down MenuPure CSS Dropdown Menu

Sunday, 22 May 2016

How To Configure NFS Server With Client on RHEL/Contos 6x

How To Configure NFS Server With Client on RHEL/Contos 6x

Q. What is NFS?

-- NFS stands for Network File System, a file system developed by Sun Microsystems, Inc. It is a client/server system that allows users to access files across a network and treat them as if they resided in a local file directory. For example, if you were using a computer linked to a second computer via NFS, you could access files on the second computer as if they resided in a directory on the first computer.

Scenario :

192.168.100.220    ser1.domain.com    (NFS Server)
192.168.100.221    ser2.domain.com    (NFS Client)

Used Ports :

TCP: 111, 2049
UDP: 111, 32806

Here :
/assets and /var/www/html/domain.com/assets

These two are the directory, which are going to be share via NFS.

Step: 1. Install NFS Server ( On Server) :

# yum -y install nfs-utils rpcbind

Step: 2. Configure NFS Server :

# vi /etc/exports

# Access For All :
/assets      *(rw,async)
/var/www/html/domain.com/assets     *(rw,async)

OR

# Access For Particular Network :
/assets      192.168.100.0/24(rw,async)
/var/www/html/domain.com/assets     192.168.100.0/24(rw,async)

-- Save & Quit (:wq)

Important Note :
============


Step: 3. To Exexute the Changes made on /etc/exports :
   
# exportfs -ar

Step: 4. Restart the NFS Service :
   
# service rpcbind restart
# service nfs restart
# service nfslock restart

# chkconfig rpcbind on
# chkconfig nfs on
# chkconfig nfslock on

Step: 5. Install NFS on Client Machine :

# yum -y install nfs-utils rpcbind

Step: 6. Configure NFS Client :

# showmount -e NFS_Server_IP_Address

Export list for 192.168.100.220:
/assets 192.168.100.221
/var/www/html/domain.com/assets 192.168.100.221


Step: 7. Create a new Directory on your Client & Mount the NFS Export to the Directory :
   
# mkdir /assets
# mkdir -p /var/www/html/domain.com/assets
# mount -t nfs 192.168.100.220:/assets /assets
# mount -t nfs 192.168.100.220:/var/www/html/domain.com/assets /var/www/html/domain.com/assets

Step: 8. Restart the NFS Service :

# service rpcbind restart
# service nfs restart
# service nfslock restart

# chkconfig rpcbind on
# chkconfig nfs on
# chkconfig nfslock on

Step: 9. Finally, Mount NFS Directory Permanently on your System across the Reboots :

# vi /etc/fstab

192.168.100.220:/assets    /assets       defaults 0 0
192.168.100.220:/var/www/html/domain.com/assets   /var/www/html/domain.com/assets  nfs defaults 0 0

-- Save & Quit (:wq)

Step: 10. After any subsequent Server reboots, You can use a Single Command to mount Directories specified in the fstab file :

# mount -a

Step: 11. Now You can check the Mounted Directories :

# df -h -F nfs

Important commands for NFS :
  1. showmount -e : Shows the available shares on your local machine
  2. showmount -e <server-ip or hostname>: Lists the available shares at the remote server
  3. showmount -d : Lists all the sub directories
  4. exportfs -v : Displays a list of shares files and options on a server
  5. exportfs -a : Exports all shares listed in /etc/exports, or given name
  6. exportfs -u : Unexports all shares listed in /etc/exports, or given name
  7. exportfs -r : Refresh the server’s list after modifying /etc/exports
Thanks For Visiting on My Blog, For More Tutorials Keep Visiting My Blog

Thursday, 19 May 2016

How To Configure Mod_Security & Mod_Evasive on CentOS/RHEL 6x

How To Configure Mod_Security & Mod_Evasive on CentOS/RHEL 6x


Q. What is Mod_Security?

Mod_Security is an open source web application firewall (WAF) and intrusion detection and prevention system for web applications. It is used to protect and monitor real time HTTP traffic and web applications from brute fore attacks.

Q. What is Mod_Evasive?

Mod_Evasive is an open source evasive maneuvers system for Apache server to provide evasive action in the event of an HTTP brute force, Dos or DDOS attack. It was designed to use as a network traffic detection and network management tool and can be easily configured and integrated into firewalls, ipchains, routers etc. Presently, it sends abuses reports via email and syslog facilites.

Step: 1. Installing Dependencies for mod_security :

# yum -y install gcc make wget
# yum -y install libxml2 libxml2-devel httpd-devel pcre-devel curl-devel

Step: 2. Installing Mod_Security :

# cd /usr/src
# wget http://www.modsecurity.org/download/modsecurity-apache_2.6.6.tar.gz
# tar xzf modsecurity-apache_2.6.6.tar.gz
# cd modsecurity-apache_2.6.6
# ./configure
# make install
# cp modsecurity.conf-recommended /etc/httpd/conf.d/modsecurity.conf

Step: 3. Downloading OWASP Mod_Security Core Rule Set :

# cd /etc/httpd/
# wget http://pkgs.fedoraproject.org/repo/pkgs/mod_security_crs/modsecurity-crs_2.2.5.tar.gz/aaeaa1124e8efc39eeb064fb47cfc0aa/modsecurity-crs_2.2.5.tar.gz
# tar xzf modsecurity-crs_2.2.5.tar.gz
# mv modsecurity-crs_2.2.5 modsecurity-crs
# cd modsecurity-crs
# cp modsecurity_crs_10_setup.conf.example modsecurity_crs_10_setup.conf

Step: 4. Configuring Mod_Security :

# vi /etc/httpd/conf/httpd.conf

Search for the line LoadModule in your httpd.conf and add this below line at the bottom.

LoadModule security2_module modules/mod_security2.so

Uncommented this Module :

LoadModule unique_id_module modules/mod_unique_id.so

Now set the basic rule set in your httpd.conf file. Add the following lines of code at the end of the file :

<IfModule security2_module>
    Include modsecurity-crs/modsecurity_crs_10_setup.conf
    Include modsecurity-crs/base_rules/*.conf
</IfModule>

-- Save & Quit (:wq)

Step: 5. Restart Apache Server :

# service httpd restart

How to Install Mod_Evasive in RHEL/CentOS

Step: 1. Installing Mod_Evasive :

# cd /usr/src
# wget http://www.zdziarski.com/blog/wp-content/uploads/2010/02/mod_evasive_1.10.1.tar.gz
# tar xzf mod_evasive_1.10.1.tar.gz
# cd mod_evasive
# apxs -cia mod_evasive20.c

Step: 2. Configuring Mod_Evasive :

# vi /etc/httpd/conf/httpd.conf

By default installation adds the following line of mod_evasive configuration to your Apache configuration file. Please verify that it should be there like similar to below. If you can’t see this below line, then add this to your httpd.conf file.

LoadModule evasive20_module   /usr/lib64/httpd/modules/mod_evasive20.so

Now add the mod_evasive configuration parameters to your Apache configuration at the end. Replace someone@somewhere.com with your Email Id to get email alerts.

<IfModule mod_evasive20.c>
        DOSHashTableSize    3097
        DOSPageCount        2
        DOSSiteCount        50
        DOSPageInterval     1
        DOSSiteInterval     1
        DOSBlockingPeriod   60
        DOSSystemCommand  "echo 'My Organization-mod_evasive HTTP Blacklisted %s on your_hostname (192.168.100.220) more info here: http://www.whatismyipaddress.com/ip/%s' | mail -s 'My Organization Banned IP by mod_evasive on your_hostname' -r myapache@domian.com someone@somewhere.com"
</IfModule>

-- Save & Quit (:wq)

Step: 3. Next restart the Apache service to Update Changes :

# service httpd restart

Thanks For Visiting on My Blog, For More Tutorials Keep Visiting My Blog

Sunday, 15 May 2016

Install & Configure Memcached With phpMemcachedAdmin on CentOS/RHEL 6x

Install & Configure Memcached With phpMemcachedAdmin on CentOS/RHEL 6x

Q. What Is Memcached ?

-- Memcached is a general-purpose distributed memory caching system. It is often used to speed up dynamic database-driven websites by caching data and objects in RAM to reduce the number of times an external data source (such as a database or API) must be read.

Step: 1. Bind Hosts File :

# vi /etc/hosts

192.168.72.141    memcache.domain.com    memcache

-- Save & Quit (:wq)

Step: 2. Disable Selinux & Stop Firewall :

# vi /etc/sysconfig/selinux

SELINUX=disabled

-- Save & Quit (:wq)

# service iptables stop
# chkconfig iptables off

Step: 3. Reboot the System :

# init 6

Step: 4. Configure EPEL Repo :

# yum -y install epel-release

Step: 5. Install Apache Server :

# yum -y install httpd httpd-devel

Step: 6. Install PHP :

# yum -y install php php-mysql php-common php-gd php-mbstring php-mcrypt php-devel php-xml php-xmlrpc php-snmp

Step: 7. Install Memcached :

# yum -y install memcached

Step: 8. Configure Memcached :

# vi /etc/sysconfig/memcached

# Running on Port 11211
PORT="11211"

# Start as memcached daemon
USER="memcached"

# Set max simultaneous connections to 1024
MAXCONN="1024"

# Set Memory size to 2048 - 4GB(4096)
CACHESIZE="2048"

# Set server IP address
OPTIONS="-l 192.168.72.141"

-- Save & Quit (:wq)

Step: 9. Start Memcached :

# chkconfig memcached on
# service memcached start
# service memcached status

Step: 10. Verifing Memcached :

# netstat -tulpn | grep :11211

# memcached-tool 192.168.72.141 stats

Step: 11. Install Memcached PHP Extension :

# yum -y install php-pecl-memcached php-pecl-memcache

Step: 12. Install Memcached Perl Library :

# yum -y install perl-Cache-Memcached

Step: 13. Install Memcached Python Library :

# yum -y install python-memcached

Step: 14. Star Apache Server :

# service httpd restart
# chkconfig httpd on

Step: 15. Configure Memcache For Web Monitoring :

# cd /var/www/html
# mkdir memcached
# cd memcached
# wget http://phpmemcacheadmin.googlecode.com/files/phpMemcachedAdmin-1.2.2-r262.tar.gz
# tar -xvzf phpMemcachedAdmin-1.2.2-r262.tar.gz
# chmod +rx *
# chmod 0777 Config/Memcache.php
# chmod 0777 Temp/
# rm phpMemcachedAdmin-1.2.2-r262.tar.gz

Step: 16. Configure Apache Password Protected Directory :

# vi /etc/httpd/conf/httpd.conf

<Directory /var/www/html/memcached>
        Options -Indexes +Multiviews
           DirectoryIndex index.php index.html
        AllowOverride AuthConfig

        AuthUserFile /etc/httpd/.htpasswd
        AuthName "phpMemcachedAdmin Login Area"
        AuthType Basic
        require user memadmin
        

        Allow from all
</Directory>

-- Save & Quit (:wq)


Step: 17. Setup AuthUserFile for Apache :

# htpasswd -cm /etc/httpd/.htpasswd memadmin

New password:
Re-type new password:
Adding password for user memadmin


Step: 18. Restart Apache Service & Access URL :

# service httpd restart

http://192.168.72.141/
memcached

Thanks For Visiting on My Blog, For More Tutorials Keep Visiting My Blog


memcached is an open source distributed memory object caching system used for accelerating applications.  - See more at: https://docs.nexcess.net/article/what-is-memcached.html#sthash.g7XxDDq9.dpuf
memcached is an open source distributed memory object caching system used for accelerating applications. - See more at: https://docs.nexcess.net/article/what-is-memcached.html#sthash.g7XxDDq9.dpuf

Wednesday, 11 May 2016

How to Protect SSH with Fail2ban on CentOS/RHEL 6x

How to Protect SSH with Fail2ban on CentOS/RHEL 6x

About Fail2ban :

-- Fail2ban is an intrusion prevention software framework that protects Servers from Brute-force Attacks. Written in the Python programming language, it is able to run on POSIX systems that have an interface to a packet-control system or firewall installed locally, for example, iptables or TCP Wrapper.

Step: 1. Install Fail2Ban :

Note: Fail2ban is not Available from CentOS, we should start by downloading the EPEL Repository.

# rpm -Uvh http://dl.fedoraproject.org/pub/epel/6/x86_64/epel-release-6-8.noarch.rpm

Follow up by Installing Fail2ban :

# yum -y install fail2ban

Step: 2. Copy the Configuration File :

# cp /etc/fail2ban/jail.conf /etc/fail2ban/jail.local

Step: 3. Configure defaults in Jail.Local :

# vi /etc/fail2ban/jail.local

[DEFAULT]

# "ignoreip" can be an IP address, a CIDR mask or a DNS host. Fail2ban will not
# ban a host which matches an address in this list. Several addresses can be
# defined using space separator.
ignoreip = 127.0.0.1/8 x.x.0.0/16

# "bantime" is the number of seconds that a host is banned.
bantime  = 3600

# A host is banned if it has generated "maxretry" during the last "findtime"
# seconds.
findtime  = 1800

# "maxretry" is the number of failures before a host get banned.
maxretry = 3


[ssh-iptables]

enabled  = true
filter   = sshd
action   = iptables[name=SSH, port=ssh, protocol=tcp]
           sendmail-whois[name=SSH, dest=destinaton@mydomain.com, sender=sender@mydomain.com]
logpath  = /var/log/secure
maxretry = 5

-- Save & Quit (:wq)

Step: 4. Restart Fail2Ban :

# service fail2ban restart
# chkconfig fail2ban on

Step: 5. Change Mail Subject :

# vi /etc/fail2ban/action.d/sendmail-whois.conf


actionstart = printf %%b "Subject: [FAIL2BAN] <name>: started on Server5.mydomain.com
              Date: `LC_TIME=C date -u +"%%a, %%d %%h %%Y %%T +0000"`
              From: My Organization <<sender>>
              To: <dest>\n
              Hi,\n
              The jail <name> has been started successfully.\n
              Regards,\n
              My Organization" | /usr/sbin/sendmail -f <sender> <dest>


actionstop = printf %%b "Subject: [FAIL2BAN] <name>: stopped on Server5.mydomain.com
             Date: `LC_TIME=C date -u +"%%a, %%d %%h %%Y %%T +0000"`
             From: My Organization <<sender>>
             To: <dest>\n
             Hi,\n
             The jail <name> has been stopped.\n
             Regards,\n
             My Organization" | /usr/sbin/sendmail -f <sender> <dest>


actionban = printf %%b "Subject: [FAIL2BAN] <name>: banned <ip> on Server5.mydomain.com (192.168.72.142)
            Date: `LC_TIME=C date -u +"%%a, %%d %%h %%Y %%T +0000"`
            From: My Organization <<sender>>
            To: <dest>\n
            Hi,\n
            The IP <ip> has just been banned on Server2.mydomain.com (192.168.72.142) for 30 Minutes by My Organization after
            <failures> attempts against <name>.\n\n
            Here are more information about http://www.whatismyipaddress.com/ip/<ip> \n
#            `/usr/bin/whois <ip>`\n
            Regards,\n
            My Organization" | /usr/sbin/sendmail -f <sender> <dest>

-- Save & Quit (:wq)

Step: 6. Restart Fail2Ban Service :

# service fail2ban restart

Thanks For Visiting on My Blog, For More Tutorials Keep Visiting My Blog

Saturday, 7 May 2016

How To Install & Configure Percona XtraDB Cluster 5.6 on CentOS/RHEL 6x


How To Install Percona XtraDB Cluster 5.6 on CentOS/RHEL 6x


This Cluster will be assembled of Two (2) Servers/Nodes :

Node #1
Hostname: server1.centos.com
IP: 192.168.100.140

Node #2
Hostname: server2.centos.com
IP: 192.168.100.142

Prerequisites :
==========

1. All two Nodes have a CentOS 6.6 Installation.
2. Firewall has been set up to allow Connecting to Ports 3306, 4444, 4567 and 4568
3. SELinux is Disabled
4. MySQL should be Removed.

5. Configure Password-less Authentication (RSA/DSA) (Optional).

Installation :
=========
   
Step: 1. Make entry to the host file of each Server :

# vi /etc/hosts

192.168.100.140 server1.centos.com   server1
192.168.100.142 server2.centos.com   server2

-- Save & Quit (:wq)
   
Step: 2. Enable EPEL Repo and Percona Repo on your Server :

# rpm -Uvh http://dl.fedoraproject.org/pub/epel/6/x86_64/epel-release-6-8.noarch.rpm
   
Step: 3. Install Dependency for Percona :

# yum install -y socat libaio* perl-DBD-MySQL  perl-Time-HiRes rsync wget
# wget --no-cache http://www.convirture.com/repos/definitions/rhel/6.x/convirt.repo -O /etc/yum.repos.d/convirt.repo
# yum makecache
   
Step: 4. Download the Packages on the Server :

# yum -y install http://www.percona.com/downloads/percona-release/redhat/0.1-3/percona-release-0.1-3.noarch.rpm
# yum install -y Percona-XtraDB-Cluster-56
   
Step: 5. Configuring the Nodes :
   
On Node1 : i.e 192.168.100.140
========================
# vi /etc/my.cnf
   
[mysqld]
skip-host-cache
skip-name-resolve
max_connections=10000
max_connect_errors=200

datadir=/var/lib/mysql
user=mysql

# Path to Galera library
wsrep_provider=/usr/lib64/libgalera_smm.so

# Cluster connection URL contains the IPs of node#1, node#2
wsrep_cluster_address=gcomm://192.168.100.140,192.168.100.142

# In order for Galera to work correctly binlog format should be ROW
binlog_format=ROW

# MyISAM storage engine has only experimental support
default_storage_engine=InnoDB

# This is a recommended tuning variable for performance
innodb_locks_unsafe_for_binlog=1

# This changes how InnoDB autoincrement locks are managed and is a requirement for Galera
innodb_autoinc_lock_mode=2

# Node #1 Address
wsrep_node_address=192.168.100.140

# SST Method
wsrep_sst_method=xtrabackup

# Cluster Name
wsrep_cluster_name=my_centos_cluster

# Authentication for SST Method
wsrep_sst_auth="sstuser:s3cret"
wsrep_replicate_myisam=1

-- Save & Quit (:wq)
       
Step: 6. Start the first Node with the Following Command :
   
# /etc/init.d/mysql bootstrap-pxc

OR

# /etc/init.d/mysql start --wsrep-cluster-address="gcomm://"
   

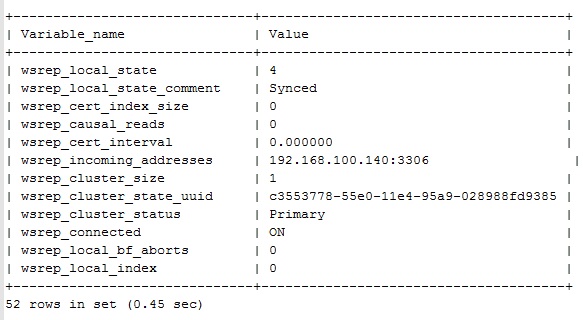
Step: 7. Now, Login to MySQL and check the Cluster Status :

# mysql -u root

mysql> show status like 'wsrep%';


Step: 8. Change the MySQL root Password :

# mysql -u root
   
mysql> UPDATE mysql.user SET password=PASSWORD("redhat") where user='root';
mysql> FLUSH PRIVILEGES;

Step: 9. In order to perform Successful State Snapshot Transfer using XtraBackup new user Needs to be set up with proper Privileges :

# mysql -u root -p
Enter Password:

mysql> CREATE USER 'sstuser'@'localhost' IDENTIFIED BY 's3cret';
mysql> GRANT RELOAD, LOCK TABLES, REPLICATION CLIENT ON *.* TO 'sstuser'@'localhost';
mysql> FLUSH PRIVILEGES;
   
Note: MySQL root account can also be used for setting up the SST with Percona XtraBackup, BUT it's recommended to use a different (non-root) user for this.
   
Node 2 : i.e 192.168.100.142
======================

# vi /etc/my.cnf
   
[mysqld]
skip-host-cache
skip-name-resolve
max_connections=10000
max_connect_errors=200

# Path to Galera library
wsrep_provider=/usr/lib64/libgalera_smm.so

# Cluster connection URL contains IPs of node#1, node#2
wsrep_cluster_address=gcomm://192.168.100.140,192.168.100.142

# In order for Galera to work correctly binlog format should be ROW
binlog_format=ROW

# MyISAM storage engine has only experimental support
default_storage_engine=InnoDB

# This is a recommended tuning variable for performance
innodb_locks_unsafe_for_binlog=1

# This changes how InnoDB autoincrement locks are managed and is a requirement for Galera
innodb_autoinc_lock_mode=2

# Node #2 address
wsrep_node_address=192.168.100.142

# Cluster name
wsrep_cluster_name=my_centos_cluster

# SST method
wsrep_sst_method=xtrabackup

# Authentication for SST method
wsrep_sst_auth="sstuser:s3cret"
wsrep_replicate_myisam=1

-- Save & Quit (:wq)

Now Start the Cluster on Node 2 :
       
# service mysql restart
# mysql -u root -p
Enter Password:

mysql> show status like 'wsrep%';


Testing :
======

A. Creating the new Database on the Node2 :

mysql> CREATE DATABASE test;

B. Creating the Example Table :

mysql> USE test;
mysql> CREATE TABLE example (node_id INT PRIMARY KEY, node_name VARCHAR(30));

C. Inserting Records on the Node1 :

mysql> INSERT INTO test.example VALUES (1, 'test1');

D. Retrieving all the Rows from that Table on the Node2 :

mysql> SELECT * FROM test.example;


Thanks For Visiting on My Blog, For More Tutorials Keep Visiting My Blog

Saturday, 30 April 2016

How to Install & Configure LAMP Server On Ubuntu 14.04


How to Install & Configure LAMP Server On Ubuntu 14.04
Step: 1. Bind Hosts File :

# vi /etc/hosts

192.168.1.250 ser1.domain.com    ser1

-- Save & Quit (:wq)

Step: 2. Install Apache2 Server :

# apt-get update
# apt-get -y install apache2 apache2-utils

<<<<<<How to Find your Server’s IP address>>>>>

# ifconfig eth0 | grep inet | awk '{ print $2 }'

Step: 3. Install MySQL Server :

# apt-get -y install mysql-server libapache2-mod-auth-mysql

Note: Once you have installed MySQL, we should activate it with this command :

# mysql_install_db

Step: 4. Set MySQL Root Password :

# mysql_secure_installation

# service mysql restart

Step: 5. Install PHP 5.5 :

# apt-get -y install php5 php5-dev libapache2-mod-php5 php5-mcrypt php5-mysql php5-cli \
   php5-common php5-curl php5-gd php5-imap php5-imagick php5-intl php5-ldap  \
   php5-memcache php5-memcached  php5-snmp php5-xcache php5-xmlrpc

# vi /etc/apache2/mods-enabled/dir.conf

<IfModule mod_dir.c>
          DirectoryIndex index.php index.html index.cgi index.pl index.php index.xhtml index.htm
</IfModule>

-- Save & Quit (:wq)

Step: 6. Search PHP Modules (Optional) :

# apt-cache search php5-
# apt-get -y install php5-json

Step: 7. See PHP on your Server :

# vi /var/www/html/info.php

<?php
phpinfo();
?>

-- Save & Quit (:wq)

http://ip_address/info.php

Or

# php -v

Step: 8. Download & Install phpMyAdmin (To Access MySQL Server Graphically) :

# cd /var/www/html
# wget http://jaist.dl.sourceforge.net/project/phpmyadmin/phpMyAdmin/4.0.10/phpMyAdmin-4.0.10-english.tar.gz
# tar -zxvf phpMyAdmin-4.0.10-english.tar.gz
# mv phpMyAdmin-4.0.10-english pma
# rm -rf phpMyAdmin-4.0.10-english.tar.gz
# cd pma/
# mv config.sample.inc.php config.inc.php

# service apache2 restart
# service mysql restart

Step: 9. Configure phpMyAdmin with MD5 Password Protected :

# vi /etc/apache2/sites-available/pma.domain.com.conf

<VirtualHost *:80>
  DocumentRoot /var/www/html/pma
  ServerName pma.anything.com
  # ServerAlias www.pma.domain.com

# Authorize for setup
<Directory /var/www/html/pma/setup>
    <IfModule mod_authn_file.c>
    AuthType Basic
    AuthName "phpMyAdmin Setup"
    AuthUserFile /home/secure/.htpasswd
    </IfModule>
    Require valid-user
</Directory>

<Directory /var/www/html/pma>
   Options All Indexes FollowSymLinks
    AllowOverride All
    Order allow,deny
    Allow from all
</Directory>
</VirtualHost>

-- Save & Quit (:wq)

# mkdir /home/secure/
# htpasswd -c /home/secure/.htpasswd pmaadmin

# cd /etc/apache2/sites-enabled/
# ln -s /etc/apache2/sites-available/pma.domain.com.conf pma.domain.com.conf
Or
# a2ensite  pma.domain.com

# service apache2 restart

http://pma.domain.com

Thanks For Visiting on My Blog, For More Tutorials Keep Visiting My Blog

Friday, 29 April 2016

Linux Tmux Vs Screen Command

Linux Tmux Vs Screen Command


Q. What is tmux ?

-- tmux is a software application that can be used to multiplex several virtual consoles, allowing a user to access multiple separate terminal sessions inside a single terminal window or remote terminal session.

Q. What is Screen ?

-- Screen is a full-screen software program that can be used to multiplexes a physical console between several processes (typically interactive shells). It offers a user to open several separate terminal instances inside a one single terminal window.

Step: 1. Install tmux :

# yum -y install epel-release
# yum -y install tmux

Step: 2. Install Screen :

# yum -y install screen

Tmux Vs Screen
Tmux Vs Screen
Tmux Vs Screen

Thanks For Visiting on My Blog, For More Tutorials Keep Visiting My Blog

Saturday, 23 April 2016

Easy Way to Install the MongoDB PHP Driver on CentOS/RHEL 6x & Ubuntu 14.04

Install the MongoDB PHP Driver on CentOS/RHEL 6x & Ubuntu 14.04

Step: 1. Install Apache Server :

For CentOS Users :

# yum -y install httpd httpd-devel

For Ubuntu Users :

# apt-get -y install apache2

Step: 2. Install PHP :

For CentOS Users :

# yum -y install epel-release
# yum -y install php php-cli php-mysql php-common php-gd php-mbstring php-mcrypt php-devel \
php-xml php-imap php-ldap php-mbstring php-odbc php-pear php-xmlrpc php-soap php-intl mod_ssl
 
For Ubuntu Users :

# apt-get -y install php5 php5-cli libapache2-mod-php5 php-pear php5-dev

Step: 3. Install Mongo Driver :

For CentOS Users :

# yum -y install openssl-devel
# pecl install mongo

For Ubuntu Users :

# pecl install mongo

Step: 4. Add the Extension in php.ini File :

For CentOS Users :

# vi /etc/php.d/mongo.ini

extension=mongo.so

-- Save & Quit (:wq)

For Ubuntu Users :

# vi /etc/php5/conf.d/mongo.ini

extension=mongo.so

-- Save & Quit (:wq)

Step: 5. Finally Restart the Apache Service :

For CentOS Users :

# service httpd restart

For Ubuntu Users :

# service apache2 restart

Step: 6. Now Create a info.php File Under /var/www/html & Check the Mongo Driver :

# vi /var/www/html/info.php

<?php
    phpinfo ();
?>

-- Save & Quit (:wq)

http://ip_address/info.php

Thanks For Visiting on My Blog, For More Tutorials Keep Visiting My Blog

Saturday, 16 April 2016

How To Use Iptables Rules For Linux

Iptables Rules For Linux

Q. What is iptables?

 -- It’s the basics of Firewall for Linux. Iptables is a rule based firewall system and it is normally pre-installed on a Unix operating system which is controlling the incoming and outgoing packets. By-default the iptables is running without any rules, we can create, add, edit rules into it.

Rule: 1. Block Specific IP Address in IPtables Firewall :

# iptables -A INPUT -s xxx.xxx.xxx.xxx -j DROP

Note: In case you only want to block TCP traffic from that IP address:

# iptables -A INPUT -p tcp -s xxx.xxx.xxx.xxx -j DROP

Rule: 2. Unblock IP Address in IPtables Firewall :

# iptables -D INPUT -s xxx.xxx.xxx.xxx -j DROP

Rule: 3. Block Specific Port on IPtables Firewall :

# iptables -A OUTPUT -p tcp --dport xxx -j DROP

Rule: 4. To Allow Incoming Connections use :

# iptables -A INPUT -p tcp --dport xxx -j ACCEPT

Rule: 5. Allow Multiple Ports on IPtables using Multiport :

# iptables -A INPUT  -p tcp -m multiport --dports 22,80,443 -j ACCEPT
# iptables -A OUTPUT -p tcp -m multiport --sports 22,80,443 -j ACCEPT

Rule: 6. Allow Specific Network Range on Particular Port on IPtables :

# iptables -A OUTPUT -p tcp -d 192.168.100.0/24 --dport 22 -j ACCEPT

Rule: 7. Block Facebook on IPtables Firewall :

# host facebook.com
facebook.com has address 66.220.156.68

# whois 66.220.156.68 | grep CIDR
CIDR: 66.220.144.0/20

# iptables -A OUTPUT -p tcp -d 66.220.144.0/20 -j DROP

Rule: 8. Setup Port Forwarding in IPtables :

# iptables -t nat -A PREROUTING -i eth0 -p tcp --dport 25 -j REDIRECT --to-port 2525

Rule: 9. Block Network Flood on Apache Port with IPtables :

# iptables -A INPUT -p tcp --dport 80 -m limit --limit 100/minute --limit-burst 200 -j ACCEPT

Rule: 10. Block Incoming Ping Requests on IPtables :

# iptables -A INPUT -p icmp -i eth0 -j DROP

Rule: 11. Allow loopback (127.0.0.1) Access :

# iptables -A INPUT -i lo -j ACCEPT
# iptables -A OUTPUT -o lo -j ACCEPT

Rule: 12. Block Access to Specific MAC Address on IPtables :

# iptables -A INPUT -m mac --mac-source 00:00:00:00:00:00 -j DROP

Rule: 13. Limit the Number of Concurrent Connections per IP Address :

# iptables -A INPUT -p tcp --syn --dport 22 -m connlimit --connlimit-above 3 -j REJECT

Rule: 14. Setup IPtables Rules for PCI Compliance :

# iptables -I INPUT -d SITE -p tcp -m multiport --dports 21,25,110,143,465,587,993,995 -j DROP

If you use cPanel or similar control panel, you may need to block it’s’ ports as well. Here is an example:

# iptables -I in_sg -d DEDI_IP -p tcp -m multiport --dports  2082,2083,2095,2096,2525,2086,2087 -j DROP

Rule: 15. Block Connection on Network Interface :

# iptables -A INPUT -i eth0 -s xxx.xxx.xxx.xxx -j DROP

Rule: 16. Disable Outgoing Mails through IPTables :

# iptables -A OUTPUT -p tcp --dports 25,465,587 -j REJECT

Thanks For Visiting on My Blog, For More Tutorials Keep Visiting My Blog

Thursday, 14 April 2016

How To Install PHP 7 on CentOS/RHEL 6x

Install PHP 7 on CentOS/RHEL 6x


Step: 1. You must add the Webtatic & EPEL yum Repository :

For CentOS/RHEL 7.x :

# rpm -Uvh https://dl.fedoraproject.org/pub/epel/epel-release-latest-7.noarch.rpm
# rpm -Uvh https://mirror.webtatic.com/yum/el7/webtatic-release.rpm

CentOS/RHEL 6.x :

# rpm -Uvh https://mirror.webtatic.com/yum/el6/latest.rpm

Step: 2. Now you can install PHP 7.0 (along with an opcode cache) by doing :

# yum install -y --enablerepo=webtatic-testing php70w php70w-opcache php70w-bcmath php70w-cli php70w-common php70w-dba php70w-devel php70w-embedded php70w-enchant php70w-fpm php70w-gd php70w-imap php70w-interbase php70w-intl php70w-ldap php70w-mbstring php70w-mcrypt php70w-mysql php70w-mysqlnd php70w-odbc php70w-pdo php70w-pdo_dblib php70w-pgsql php70w-process php70w-pspell php70w-recode php70w-snmp php70w-soap php70w-tidy php70w-xml php70w-xmlrpc --skip-broken

Step: 3. Changes on the Module File for Php :

# vi /etc/httpd/conf.d/php.conf

-- Line no. 6 & 10 replace with these Lines.

LoadModule php7_module modules/libphp7.so (replace with line nuber 6)
LoadModule php7_module modules/libphp7-zts.so (replace with line number 10)
AddHandler php7-script .php (replace with line number 16)

-- Save & Quit (:wq)

Step: 4. Create a php info file & Check :

# vi /var/www/html/info.php

<?php
  phpinfo ();
?>

-- Save & Quit (:wq)

# service httpd restart

Check on Browser http://IP-Address/info.php

or Check through CLI :

# php -v

PHP 7.0.0RC2 (cli) (built: Sep  4 2015 21:04:20)
Copyright (c) 1997-2015 The PHP Group
Zend Engine v3.0.0-dev, Copyright (c) 1998-2015 Zend Technologies
    with Zend OPcache v7.0.6-dev, Copyright (c) 1999-2015, by Zend Technologies
   
Thanks For Visiting on My Blog, For More Tutorials Keep Visiting My Blog

Friday, 8 April 2016

MySQL Important Useful Commands

MySQL Important Useful Commands

MySQL Important Useful Commands:

1. MySQL Dump For Single Database :

#
mysqldump --force --opt --single-transaction --lock-tables=false --skip-events --user=root --password=password --routines --databases shockable > /tmp/shockable.sql

2. MySQL Dump For All Databases :

#
mysqldump --force --opt --single-transaction --lock-tables=false --skip-events --user=root --password=password --routines --all-databases > /tmp/all_backups.sql

3. Restore Database from MySQL Dump :

#
mysql -u root -ppassword < /tmp/all_backups.sql

4. Restore a Single Database from All_Databases :

#
mysql -u root -p --one-database destdbname < /tmp/all_databases.sql

5. Backup A Single Table (Table Name: users) :

#
mysqldump -u root -ppassword database_name users > /tmp/users.table.sql

6. Restore that Table :

mysql>
create database database_name;
mysql>
exit

#
mysql -u root -ppassword database_name < /tmp/users.table.sql

7. MySQL Ignore Table :

#
mysqldump -u username -ppasswword --ignore-table=dbname.tablename dbname > /tmp/dbname.sql

8. Show MySQL Database size:

#
mysql -u root -p
Enter the Password:

SELECT table_schema "Data Base Name",
sum( data_length + index_length ) / 1024 /
1024 "Data Base Size in MB",
sum( data_free )/ 1024 / 1024 "Free Space in MB"
FROM information_schema.TABLES
GROUP BY table_schema ;

OR
SELECT 'Total DB Size' SizeInMB,
sum( data_length + index_length ) / 1024 /
1024 "Data Base Size in MB"
FROM information_schema.TABLES
where table_schema not in ('mysql','information_schema');


9. To view individual Database Size in MySQL :

#
mysql -u root -p
Enter the Password:

SELECT table_schema                                        "DB Name",
   Round(Sum(data_length + index_length) / 1024 / 1024, 1) "DB Size in MB"
FROM   information_schema.tables
GROUP  BY table_schema;

OR
SELECT table_schema,
sum( data_length + index_length ) / 1024 /
1024 "Data Base Size in MB"
FROM information_schema.TABLES
where table_schema not in ('mysql','information_schema','performance_schema')
group by table_schema
order by 2 desc;


10. MySQL Cluster Status :

#
mysql -u root -p
Enter the Password:

mysql> show status like 'wsrep%';

11. To Check MySQl Cluster is Synced or Not :
# /usr/bin/clustercheck root root_password

Thanks For Visiting on My Blog, For More Tutorials Keep Visiting My Blog

 
Copyright © 2016 Kousik Chatterjee's Blog